We Handle the Funding—So You Can Focus on the Planning!
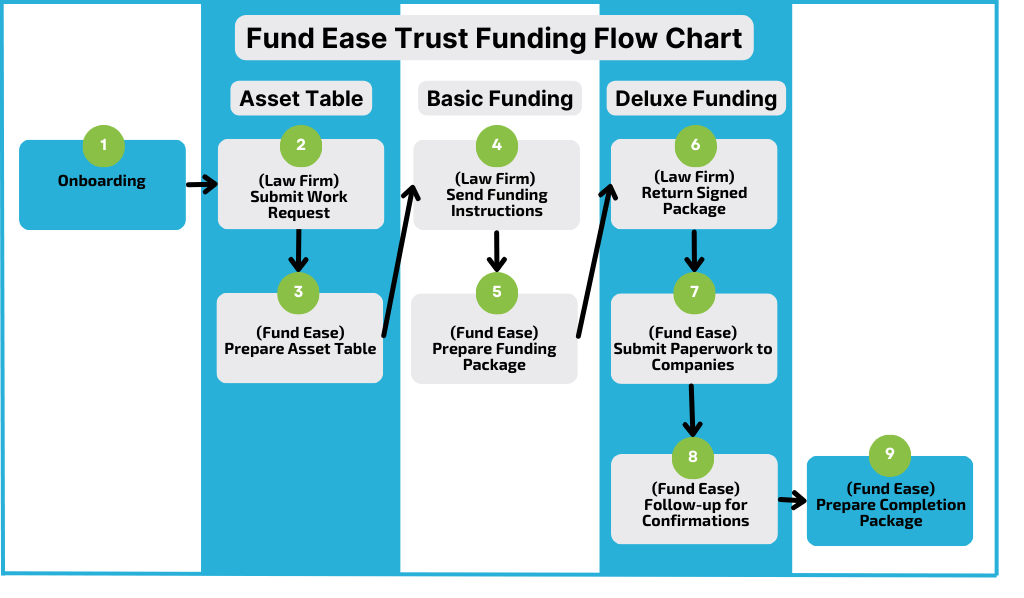
Our Trust Funding Process


Onboarding
The onboarding process is quite simple. There are no commitments or onboarding fees involved. Only pay for the services when you need them.
2) Services Agreement
A Services Agreement will be sent your way for review and one-time signature. This document is meant to describe the scope of services and define the obligations and responsibilities of each party to prevent any misunderstandings.
3) Shared folder set up
Once your Agreement has been returned, we will set up a shared folder for us to securely exchange files.
1) Introduction Call
We will schedule a brief phone call to get familiarized with each other and discuss the general funding process.
At this point, you will have everything needed to successfully send over your first work request.


Work Request Submitted
Submitting a work request is as easy as 1, 2, 3!
2) Upload to Shared Folder
Create a new sub-folder for the client and add all of the above items to the folder.
3) Email Work Request
Send an email to let us know there is a new work request available.
1) Collect Initial Items
Work Request Form
Client's Personal Information
Statement for each account
Copy of executed trust


(Law Firm)
Asset Table Prepared
This is typically completed within a week.
2) Data Entry
The information from the statements will be inserted on an Excel spreadsheet designed perfectly for the trust funding process. If any information is missing, we will highlight what is needed in the notes column.
3) Asset Table Saved in Shared Folder
Once complete, the Asset Table will be saved in the shared folder and an email will be sent to let you know it is ready.
1) Statement Review
We will review statements to find the pertinent information for each asset.
If this was an Asset Table only request, we will conclude our work here and an invoice will be sent over.
If the file will be moving forward to Basic or Deluxe funding, you will continue to the next step and be invoiced after the funding instructions have been received.


(Fund Ease)
Funding Instructions Provided
A invoice will be sent out at this time and payment will be required before the Funding Package can be released.
1) Insert Allocations
Insert ownership and beneficiary designation instructions on the Asset Table.
2) Review Allocations with Clients (optional)
It is highly recommend that you review the funding changes with your clients before we begin preparing the paperwork. Although we do not require clients to sign off on the changes, we have included signature lines at the bottom of the Asset Table and feel it is good practice to acquire these signatures.
3) Save Allocations in Shared Folder
Once allocations have been added, simply re-save the Asset Table in the shared folder and let us know that the file is ready to move forward.


(Law Firm)
Funding instructions are much clearer with exact names, spelling, and percentages, rather than vague instructions like "spouse" or "equal shares to children".
A simple "No Action" is much clearer than leaving the allocation box blank. Likewise, if there will not be a contingent beneficiary named, indicating with "None" is much more descriptive.
Providing clear instructions will save time and confusion.
Funding Package Prepared
You can sit back and relax while Fund Ease works on the most time-consuming and detail critical portion of the trust funding process.
2) Form Preparation
In addition to filling out forms, we also prepare Instruction and Confirmation of Action letters to be submitted to the companies.
3) Package Saved in Shared Folder
Once the forms and letters are prepared, we combine everything into a neat package. The package begins with step-by-step signing instructions to ensure the signing process goes smoothly. The package will be saved in the shared folder and an email will be sent to let you know it is ready to print.
1) Form Collection
We will reach out to companies and advisors to collect the correct forms or coordinate the account changes.
If this was a Basic Funding request, we will conclude our work here.
If Deluxe Funding was selected, simply acquire the client signatures and then mail the package back to us.


(Fund Ease)
Return Signed Documents
Rest assured, Fund Ease will handle the remaining actions of the funding process.
1) Acquire Client signatures
Meeting in person with your clients is preferred, as the paperwork often requires witness or Notary signatures that your office can provide.
2) Scan Signed Paperwork
It's good practice to scan all the documents before placing in the mail. This can also expedite the process, as we are able to fax some items immediately without waiting on the mail.
3) Mail to Fund Ease
Place all signed paperwork in an envelope and then drop it in the mail to Fund Ease.


(Fund Ease)
If you prefer to forgo the signing meeting, you can mail the Funding Package to your clients or select our Physical Package add-on service and we will print and mail the package directly to your clients to sign and then return to us.
Paperwork Submitted to Companies
2) Paperwork Submitted
Anything that can be faxed will be submitted immediately and everything else will go out as soon as it's received. Any additional documentation, such as relevant trust pages, POA, death certificates will also be submitted with the paperwork.
3) Submissions Notated
A copy of all items submitted will be saved for future reference. The date and mode of submission will be recorded.
1) Paperwork Reviewed
We review each document to make sure there are no missing signatures and that any additional information the clients were supposed to hand-write in has been completed.


(Fund Ease)
Follow-up for Confirmations
If for any reason the clients receive a rejection letter, we will do everything in our power to resolve the issue.
1) First Follow-up
We will reach out to the clients around the time that they should begin to see confirmations arriving in their mailbox.
2) Second Follow-up
Our second attempt to follow-up for confirmations will be a couple weeks after our first attempt.
3) Final Follow-up
If your clients have been unresponsive to the first two attempts, we will try reaching out one last time. We will contact you at this point to see if there is a better approach. Some clients may require a phone call or a physical letter to re-engage them in the funding process.
Our follow-up process works best if we can email your clients directly. We recommend setting up a funding email, such as funding@yourdomain.com for our use. Alternatively, we have a generic funding department Gmail or we can draft and send the follow-up emails to your office so you can forward to your clients.


(Fund Ease)
Completion Package
Success!
Your client's assets are now funded.
1) Confirmations Reviewed & Recorded
As we receive the confirmations, we will review for accuracy and notate the date of completion on the Asset Table. We will also notate any new account numbers or values, if provided.
2) Asset Table & Confirmations Combined
A final Asset Table, followed by the confirmations will be combined into a Completion Package.
3) Completion Package Saved in Shared Folder
The Completion Package will be saved in the shared folder and an email will be sent to let you know that the client's funding is complete. This will conclude our work on the file.


(Fund Ease)
